
A clean mattress pad keeps sweat, body oils, dust, and spilled drinks from settling into the layer that sits closest to your mattress. In this guide, I break down the safest way to clean different pad materials, when to pre-treat stains, how to dry the fill without damaging it, and which habits help the bed stay fresher between washes. Knowing how to clean a mattress pad matters because the right method depends on construction, not guesswork.
Key takeaways for cleaning a mattress pad without damaging it
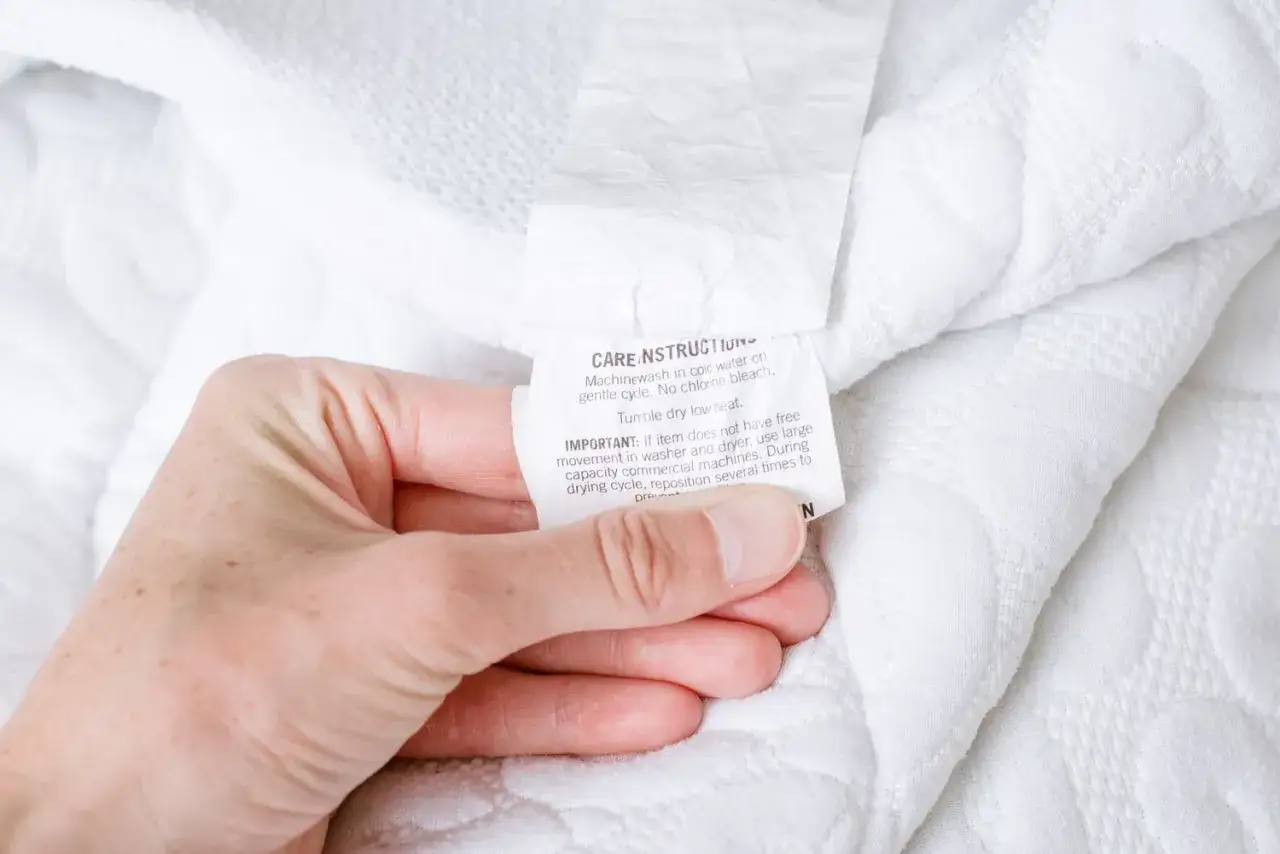
- Start with the care label; it overrides any general advice.
- Most quilted cotton or polyester pads do best on a gentle cycle with mild detergent and cold or warm water.
- Spot-treat stains before washing, and blot instead of scrubbing.
- Dry the pad completely on low heat or air dry it fully to avoid mildew and clumping.
- Wash it every 1 to 2 months in normal use, and sooner after spills, sickness, pets, or heavy sweating.
Start with the care label and the pad’s construction
I always begin with the tag, not the laundry aisle. A mattress pad may look simple, but the cleaning method changes fast once you factor in the fill, the backing, and whether the pad is truly washable or only spot cleanable.
If the label is missing, treat the pad as delicate until proven otherwise. That usually means mild detergent, low agitation, and low heat at most. A quilted cotton or polyester pad can often handle machine washing, while a wool-filled, silk-blend, memory foam, or latex-style pad usually needs a much gentler approach.
| Pad type | Best cleaning approach | What I avoid |
|---|---|---|
| Quilted cotton or polyester | Machine wash on a gentle cycle with mild detergent, then dry on low heat or air dry | Bleach, fabric softener, and high heat |
| Waterproof pad | Gentle cycle only if the label allows it, plus thorough drying | Bleach, fabric softener, and heat that can weaken the backing |
| Wool or silk blend | Spot clean first; professional cleaning may be the safer option | Soaking, agitation, and hot water |
| Memory foam or latex style | Spot clean only unless the manufacturer specifically says otherwise | Machine washing, wringing, and full submersion |
Once I know what I’m dealing with, the rest of the process gets much easier and a lot less risky. From there, it’s just a matter of washing the pad in a way that protects the stitching and fill.
The safest washing routine for most quilted pads
For a washable quilted pad, I keep the process simple. The goal is to remove soil without compacting the fill or stressing the seams, so aggressive wash settings usually do more harm than good.
- Shake the pad out and check for loose seams, torn elastic, or worn waterproof backing.
- Close zippers, fasteners, or straps so they do not twist in the drum.
- Pre-treat visible stains before the wash cycle starts.
- Load the pad loosely in the washer. If it barely fits, use a larger-capacity machine.
- Add a small amount of mild liquid detergent. More soap does not equal better cleaning.
- Run a gentle or delicate cycle with cold or warm water, unless the care label says otherwise.
- Use an extra rinse if the pad tends to hold onto detergent residue or feel stiff after washing.
I prefer a washer with enough space for the pad to move freely. When a pad is crammed into a small drum, the filling tends to bunch up, the seams take more stress, and the rinse is less effective. If your home machine is too tight, a laundromat-sized washer is often the better choice.
Pre-treat stains before they settle in
Stains are easiest to remove before heat and friction set them deeper into the fibers. That is especially true for sweat, body oil, blood, and pet accidents. My rule is simple: blot first, treat second, wash third.
- Sweat and body oil - Use a small amount of enzyme or oxygen-based stain remover and let it sit for about 10 minutes before washing.
- Blood - Rinse or blot with cold water first. Hot water can set protein stains and make them harder to remove.
- Urine or pet accidents - Blot as much moisture as possible, then use an enzyme cleaner if the care label permits it.
- Food or drink spills - Lift any residue off the surface, then treat the spot with mild detergent before the wash.
If the pad has a waterproof layer, I keep the cleaner on the top fabric and avoid soaking through to the backing. That matters more than most people realize, because too much moisture in the wrong layer can lead to odor, warping, or delamination over time.
Dry it completely and restore the loft
Drying is where many good cleaning attempts go wrong. A pad can look finished on the outside while still holding moisture in the quilting, and that trapped dampness is exactly what creates mildew smell later.
- Use low heat or no heat whenever the label allows it.
- Take the pad out and shake it partway through drying so the fill redistributes.
- For synthetic quilted pads, 2 or 3 dryer balls can help keep the filling from clumping.
- Stop only when the seams, corners, and quilt lines are fully dry, not just the surface.
- If the pad has a waterproof backing, air drying may be safer than pushing it through a hot dryer cycle.
I also avoid putting the pad back on the mattress while it still feels cool or slightly damp in the middle. That is the easiest way to trap moisture under bedding, and it is not worth the shortcut.
Common mistakes that shorten a mattress pad’s life
Most damage comes from a few predictable habits, not from one dramatic mistake. I see the same problems over and over: too much detergent, too much heat, and not enough patience during drying.
- Using bleach by default - It can weaken fibers and damage waterproof coatings unless the label explicitly allows it.
- Adding fabric softener - It leaves a coating that can reduce absorbency and interfere with waterproof layers.
- Overloading the washer - The pad cannot move freely, so dirt stays behind and the fill clumps.
- Drying on high heat - Heat can shrink cotton, crack backings, and flatten quilting.
- Putting it back slightly damp - That invites mildew and a stale smell, even if the surface feels dry.
- Scrubbing stains aggressively - It can spread the stain and rough up the top fabric.
My practical shortcut is to use less product and more time. A gentle wash, a careful rinse, and full drying solve more problems than aggressive chemistry ever does.
How often to wash it and when replacement makes more sense
For most households, a washable mattress pad benefits from cleaning every 1 to 2 months. If someone in the bed sweats heavily, has allergies, sleeps with pets, or has been sick, I would move that closer to every 2 to 4 weeks. After spills or accidents, wash it as soon as possible.
| Situation | Practical cleaning frequency | Extra note |
|---|---|---|
| Normal household use | Every 1 to 2 months | Pairs well with weekly sheet washing |
| Heavy sweating, allergies, or pets | Every 2 to 4 weeks | Wash sooner if odors build up |
| Spills, illness, or accidents | Immediately | Pre-treat first, then wash promptly |
| Spot-clean-only or specialty fill | As needed | Professional cleaning may be the safer option |
Sometimes cleaning is no longer the right answer. If the waterproof layer is cracking, the fill stays clumpy after drying, the pad still smells after two washes, or the elastic no longer holds the corners in place, replacement usually makes more sense than another round in the laundry.
Small habits that keep the bed fresher between washes
The easiest way to make a mattress pad last longer is to reduce how much work it has to do. I like to think of it as spreading out the wear: the sheets take the weekly reset, the pad handles the deeper protection, and the mattress stays out of direct contact with moisture and soil.
- Let the bed breathe for 20 to 30 minutes after waking before making it.
- Change pillowcases and sheets regularly so less soil reaches the pad.
- Vacuum mattress seams and the bed frame area from time to time to reduce dust buildup.
- Address spills the same day instead of waiting for laundry day.
- Keep a backup pad on hand if you live in a humid climate or deal with frequent night sweats.
If I had to reduce the whole process to one habit, it would be this: clean the pad gently, dry it completely, and do not wait for visible damage before acting. That combination keeps the sleep surface fresher, protects the mattress underneath, and makes the bed feel cleaner without turning bedding care into a project.