
Bed bug stains are one of the fastest clues that a sleep setup needs attention. A mattress can show small dark dots, rusty smears, or tiny blood marks long before you see a live insect, and the difference between a harmless mark and an active infestation usually comes down to pattern, location, and what else is present. I’ll walk through how to read those marks, how to tell them apart from ordinary mattress stains, and what to do next without making the problem worse.
The fastest way to read mattress stains is to look for pattern, not just color
- Bed bug evidence usually shows up as dark fecal dots, rusty-red smears, shed skins, eggs, or live insects.
- One stain is not proof; a cluster along seams, tufts, piping, or the box spring edge is much more suspicious.
- Fresh blood, sweat, mold, rust, and spilled drinks can look similar at first, so compare texture, location, and whether the mark smears.
- Strip the bed, inspect with a flashlight, and check the mattress, box spring, bed frame, and nearby furniture in the same session.
- If the stain looks suspicious, dry bedding and washable items on high heat and avoid moving loose items around the room.
What bed bug stains on a mattress usually look like
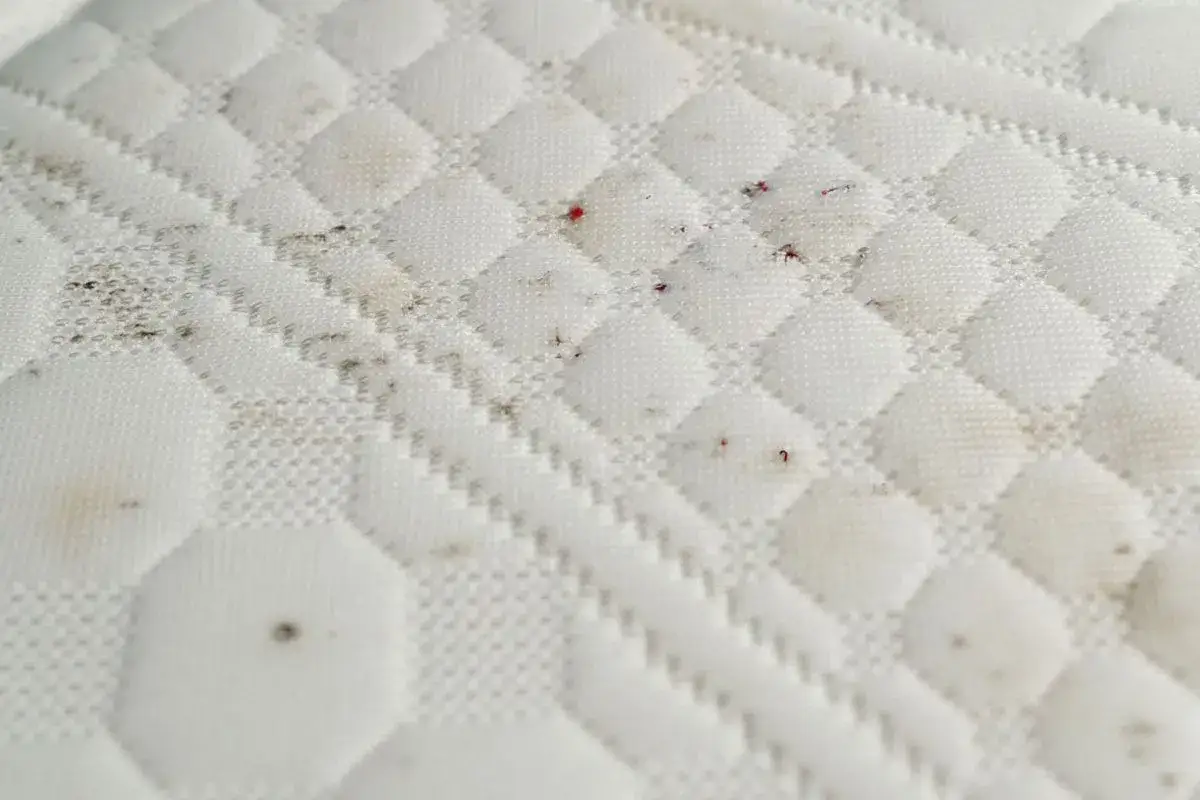
The EPA notes that the most common traces include dark excrement spots, rusty or reddish stains from crushed bugs, tiny eggs, and shed skins. When I inspect a mattress, I care less about one isolated mark and more about repetition: the same kind of dot along a seam, at the mattress edge, or on the box spring usually tells a better story than a random stain in the middle of the fabric.
Dark fecal spots
These are usually tiny black or dark brown dots. On a mattress, they tend to collect where a bug can hide and feed without moving far, especially along stitching, piping, tags, and corners. If the spot looks like it has bled into the fabric, that is an especially useful clue because it suggests digested blood rather than surface dirt.
Rusty blood smears
These marks are more irregular. They can show up when a bug is crushed after feeding or when a bite bleeds onto sheets or the mattress surface. I usually pay attention when the smear appears near a seam or in a line of small dots, because that pattern fits bed bug activity better than a lone stain does.
Eggs and shed skins
Eggs are tiny, often about 1 mm, and pale in color. Shed skins look like empty, papery shells. I treat either of these as a stronger signal than a single stain because they suggest the insects are breeding or growing nearby, not just passing through.
Once you can recognize the main stain types, the harder part is separating them from the much more common marks made by sweat, moisture, or everyday wear.
How to tell them apart from sweat, spills, mold, and rust
When I review a mattress, I look for context: does the mark sit at a seam, does it repeat in a cluster, and does it appear with other signs such as shed skins or live insects? Color alone is not enough. A mattress in a humid room, a bed with an old spring frame, or a sheet with an accidental spill can all create stains that look suspicious at first glance.
| Stain type | What it usually looks like | Where it often appears | How reliable it is as a clue |
|---|---|---|---|
| Bed bug fecal spots | Tiny black or dark brown dots; may smear rusty-brown when damp | Seams, piping, tags, corners, box spring edges | High when clustered with other signs |
| Bed bug blood smears | Rust-red or brownish streaks and small blotches | Sheets, pillowcases, mattress surface near feeding areas | Moderate to high, especially near dark spots |
| Sweat and body oil | Yellowish or grayish patches with softer edges | Center of the mattress, pillow area, frequently used spots | Low on its own |
| Mold or mildew | Irregular dark patches, sometimes with a musty smell | Damp rooms, undersides, poorly ventilated areas | Low for bed bugs unless other signs are present |
| Rust from springs or frame | Orange-brown transfer marks, often dry and uneven | Near metal parts, spring edges, broken frame joints | Low for bed bugs, but worth checking the frame |
| Drink or food spill | Random ringed stain, sticky residue, or faded splash mark | Anywhere someone drank, ate, or set something down | Usually low unless repeated with other clues |
The practical test is simple: if the stain is isolated and inconsistent, it is probably not bed bugs. If it repeats in the same hiding zone and comes with dots, shells, or live insects, I start treating it as an infestation clue. That leads naturally to the next question: where should you inspect first?
Where to inspect first on the bed and bedding
I start with the places that give bed bugs the most shelter and the easiest route to a sleeping person. That means the mattress seams, tufting, piping, tags, handles, and corners closest to the headboard. Then I move to the box spring, bed frame joints, slats, and any cracks or screw holes in the headboard. If the bed sits against a wall, I also check the wall edge, baseboard, and nightstand within arm’s reach.
- Mattress seams where fabric folds create hidden edges.
- Tufts and buttons because insects can tuck into the recesses.
- Box spring corners where dark spotting often collects first.
- Bed frame joints and slat ends, especially on older frames.
- Sheets and pillowcases for blood smears or small dark marks.
- Nearby furniture such as nightstands, upholstered chairs, and luggage rests.
I use a flashlight and inspect slowly, not in a rush. A quick visual glance misses a lot, especially if the bed has a protector or a patterned cover. If I find a suspicious dot, I widen the inspection immediately instead of cleaning first, because cleaning too early can erase the evidence I need.
That inspection order matters because it tells you what to do next without guessing.
What to do the moment you spot a suspicious stain
When a stain looks bed bug-related, I treat it like a clue that needs confirmation, not a reason to panic. The goal is to contain the problem, preserve evidence, and stop the stain from turning into a bigger spread around the room.
- Take clear photos before cleaning anything.
- Strip the bedding carefully and keep washable items together.
- Dry sheets, pillowcases, blankets, and clothing on high heat for about 30 minutes; washing alone is not reliable.
- Vacuum mattress seams, the bed frame, and the floor edge around the bed.
- Seal vacuum contents and disposable debris in a bag before removing them from the home.
- Avoid carrying loose laundry or bedding through other rooms if you still suspect bed bugs are active.
Heat is the part that matters most here. A hot dryer cycle is far more effective than washing by itself, and it is the fastest way to reduce the chance that bedding or clothing carries insects to another part of the house. The CDC notes that bite marks can take up to 14 days to show up, so I do not wait for skin symptoms to confirm the problem. I use the stain pattern, the inspection results, and the surrounding evidence together.
Once the immediate response is under control, the focus shifts to cleaning and prevention in a way that does not spread bugs further.
How to clean bedding without spreading the problem
Cleaning helps, but it should be done in a controlled way. I would not shake out linens indoors or move an unbagged comforter across the house. If bed bugs are present, careless handling is often what spreads them from the bedroom to the hall, sofa, or laundry area.
Use heat first for washable items
For sheets, pillowcases, blankets, and clothing, the safest practical move is to dry them on high heat. If an item can handle heat, the dryer is the main tool I trust. After drying, keep the items in a clean bag or sealed container until the room has been inspected and stabilized.
Use an encasement on the mattress and box spring
A good encasement does not erase an infestation, but it cuts down on hiding places and makes future inspection easier. I usually prefer to add one after the bed has been inspected and the immediate cleanup is done, because an encasement works best as part of a broader plan, not as a shortcut.
Read Also: Acaros en la Cama - Stop Dust Mites & Sleep Better
Vacuum carefully, then reset the room
Vacuuming the seams, frame, and floor edge can remove visible bugs and debris, but it is not a stand-alone fix. The room still needs follow-up checks, especially if you already found multiple suspicious stains. If the bed has a protector, I would inspect the whole setup before assuming the mattress itself is the only problem.
That careful cleanup often tells you whether you are dealing with a one-off stain or something that needs professional treatment.
When a mattress stain is a warning sign that needs professional help
There are situations where DIY inspection is enough to confirm a problem, and there are situations where it is not. I would bring in a pro faster if I found fresh stains after laundering, live bugs, eggs, or shed skins, or if the same marks kept reappearing after I cleaned the bed. In apartments and other shared housing, I am also quicker to escalate because bed bugs can move between units and hide in adjacent furniture and wall gaps.
- Fresh stains keep returning in the same area.
- You find live bugs, eggs, or cast skins.
- The stains extend beyond the mattress to the frame, baseboards, or nightstand.
- The mattress is damaged enough that a full inspection is difficult.
- Multiple rooms or neighboring units may be involved.
I would also avoid throwing the mattress out too early. Removing it without controlling the infestation can spread the problem during transport and usually costs more than targeted treatment. In many cases, the smarter move is to inspect first, document what you see, and decide on replacement only after you know how far the issue has gone.
The final step is less about a single stain and more about the next two days of observation.
The 48-hour checklist I would use before the stain gets worse
After a suspicious mark turns up, I think in short time blocks, not vague intentions. In the next 48 hours, I would recheck the same seam with a flashlight, inspect the box spring and headboard, keep clean bedding sealed until it has been heat-dried, and watch for new dots in the same area. If the pattern repeats, you are no longer dealing with a random mattress stain.
- Inspect after dark when bugs are more active.
- Check the bed frame, nightstand, and wall edge within arm’s reach of the mattress.
- Keep vacuumed debris sealed and removed from the home right away.
- Use an encasement only after the bed and surrounding furniture have been inspected.
A single stain can be a fluke, but repeated marks in the same place usually mean the bed is becoming a hiding site. That is the point where careful inspection matters more than a guess.