
A clean bed affects more than how a room looks; it changes how well you sleep, how much dust and oil build up, and how long your mattress stays supportive. The real job is not one big reset but a routine that keeps bedding, pillows, and the sleep surface working together. In this guide, I break down the weekly rhythm, the deep-clean process, stain fixes, and the habits that keep things fresher between wash days.
What matters most in a fresh sleep setup
- Wash sheets and pillowcases weekly, and shorten that cycle if pets, heat, or allergies increase buildup.
- Deep-clean the mattress about every six months, but handle spills the same day they happen.
- Dry everything completely; moisture left behind is what turns cleaning into a mildew problem.
- Use a mattress protector and pillow covers so sweat and stains do not reach the core layers.
- Watch for sagging, lingering odors, and repeated stains, because cleaning cannot fix worn-out support.
What a fresh sleep setup actually includes
I separate bed care into layers because that is where most people get tripped up. Sheets and pillowcases are the part that needs the fastest turnover, the duvet cover and comforter need slower rotation, and the mattress itself needs periodic maintenance rather than constant scrubbing. The CDC recommends washing bedding weekly and drying it completely, which is a sensible baseline if you want one simple rule to follow.| Layer | Typical cadence | Why it matters |
|---|---|---|
| Sheets and pillowcases | Weekly; every 3 to 4 days if pets sleep there or allergies are an issue | They collect sweat, oils, skin cells, and the fastest visible buildup |
| Duvet cover | Every 2 to 4 weeks | It protects the insert, but it still picks up body oils and dust |
| Comforter or blanket | Every 2 to 3 months | Less direct skin contact, but still worth cleaning regularly |
| Pillow inserts | Every 4 to 6 months if washable | They absorb oils and moisture over time, especially around the face and neck |
| Mattress | Deep-clean about every 6 months | Prevents odor, dust buildup, and stains from settling into the core |
That layered view makes the rest of the routine much easier, because once you know what gets cleaned when, you can stop overworking the wrong part of the bed and focus on the parts that actually need attention.
A weekly routine that keeps buildup under control
The weekly part does most of the heavy lifting. I prefer a routine that is fast enough to repeat without negotiation, because consistency matters more than an occasional marathon cleaning session. If your household runs warm, if you sweat at night, or if pets share the bed, the schedule becomes even more important.
- Strip the bed fully and start the laundry right away so the dirty textiles do not sit around and pick up more dust.
- Check the care labels before choosing water temperature or cycle strength. Cotton usually tolerates warmer water better than delicate synthetics.
- Wash sheets, pillowcases, and washable covers with a mild detergent, then dry them completely. Half-dry bedding is a shortcut to odor and wrinkling.
- Vacuum the mattress surface with the upholstery attachment while it is bare. Go slowly over seams, tufts, and the edges where dust collects.
- Let the mattress air out for a short while before remaking the bed, especially if the room feels humid.
- Keep a second sheet set on hand so you can remake the bed immediately instead of waiting for laundry to finish.
For me, the biggest mistake is trying to make the bed look clean while the fabrics are still carrying too much moisture or residue. If the weekly routine is solid, the deep-clean steps become shorter and less dramatic, which is exactly where I want them to be.
How I deep-clean the mattress without damaging it
Mattress cleaning is where people most often overdo it. A mattress is not a tile floor, and soaking it with product usually creates more trouble than it solves. I treat deep cleaning as controlled maintenance: remove debris, treat the surface carefully, and dry it thoroughly.
My go-to sequence
- Remove all bedding and inspect the label or manufacturer guidance before using any cleaner.
- Vacuum the entire surface, including seams and stitched areas, to pull out dust and crumbs before you add any moisture.
- Spot-clean only where needed using a lightly damp cloth and a mild cleaner appropriate for the stain. Blot instead of scrubbing.
- Use baking soda for odor control if the mattress smells stale. Let it sit for several hours, then vacuum it away completely.
- Allow full drying time with airflow from a fan or open window before putting bedding back on.
Read Also: New Mattress Topper - When to Add (or Not)
What I avoid
- Bleach and harsh solvents, which can damage fibers and leave behind irritating residue.
- Soaking foam, because trapped moisture is hard to remove and can lead to mildew.
- Putting sheets back on while the mattress still feels cool or damp to the touch.
- Rubbing stains aggressively, which often pushes them deeper instead of lifting them out.
That sequence works because it respects the material. The trick is not making the mattress look temporarily clean; it is getting it clean in a way that does not shorten its life or trap new problems inside it.
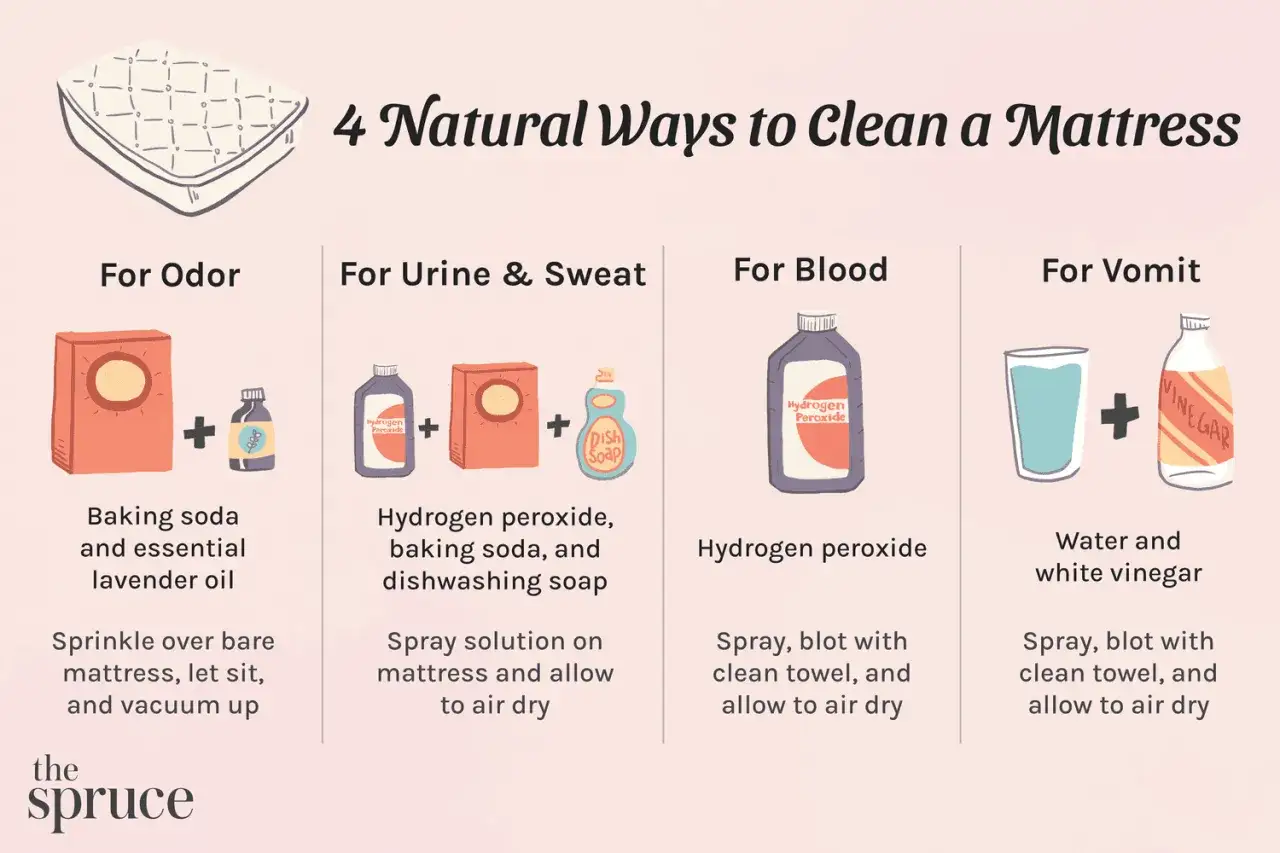
What to do about stains, smells, and allergy triggers
Different messes behave differently, and that is where a lot of cleaning advice gets vague. Sweat leaves yellowing, urine leaves odor and mineral residue, blood sets if you treat it carelessly, and musty smells usually point to trapped moisture rather than surface dirt. If I see rust-colored spotting, shed skins, or a sweet musty odor, I stop treating it like a laundry issue and inspect the seams carefully; the CDC notes that bed bugs often hide in seams and folds of bedding.
| Problem | Best first move | Common mistake | When to escalate |
|---|---|---|---|
| Sweat or yellowing | Vacuum, then spot-treat with a mild cleaner or enzyme-based product | Using too much liquid on foam | If discoloration keeps returning in the same area |
| Urine | Blot fast, treat with an enzyme cleaner, and dry thoroughly | Covering the smell with fragrance spray | If the odor reaches the padding or returns after drying |
| Blood | Use cold water first and keep heat away until the stain is gone | Switching to hot water or a dryer too early | If the stain has already set deep into the fibers |
| Musty odor | Air out the room, vacuum, and let the mattress dry fully | Rebedding the mattress before the core is dry | If the smell suggests mildew or a moisture leak |
| Possible bed bugs | Inspect seams, isolate bedding, and act quickly | Assuming a stain is harmless without checking the pattern | If you see live bugs, shells, or repeated spotting |
A stain that keeps showing up after two or three careful attempts usually means the problem reached deeper than the cover fabric. At that point, spot treatment is not the answer; you either need a deeper intervention or you need to accept that the mattress has absorbed more than it can comfortably give back.
How to keep bedding cleaner for longer
Prevention saves more effort than any cleaner ever will. I get the best results from a few boring habits that make the bedroom less hospitable to dirt, moisture, and dust in the first place. The CDC also recommends allergen-proof mattress and pillow covers, HEPA-filter vacuuming, and keeping indoor humidity around 30 to 50 percent when allergies or asthma are part of the picture.
Sleep Foundation’s mattress-care guidance lines up with a simple rule I use: many foam, latex, and newer innerspring mattresses should be rotated every 6 to 12 months unless the manufacturer says otherwise. That does not make the bed magically cleaner, but it does help the surface wear more evenly, which matters if you want your sleep setup to feel fresh for longer.
| Habit | Why it helps | Realistic limit |
|---|---|---|
| Use a mattress protector | Blocks sweat and spills before they reach the mattress core | It still has to be washed |
| Use allergen-proof covers | Creates a barrier against dust mites and allergens | It supports cleaning; it does not replace it |
| Keep humidity in check | Makes the room less friendly to mildew and dust mites | Usually needs a dehumidifier or climate control in damp homes |
| Skip food in bed | Prevents crumbs, grease, and accidental staining | Works only if everyone actually follows it |
| Vacuum the bed frame and floor | Reduces dust that would otherwise move back onto linens | Has to be done regularly to matter |
| Rotate the mattress when allowed | Helps distribute wear more evenly | Not every mattress is designed to be flipped or rotated |
The point of these habits is not perfection. It is reducing the amount of work each cleaning session has to do, which makes the whole bedroom easier to maintain without turning it into a chore.
When replacement is the cleaner fix
Cleaning has limits, and it is useful to admit that early. If the mattress still smells stale after it dries, feels lumpy in the same spots, or leaves you more sore than it used to, the problem is usually structural rather than hygienic. Once sagging is visible or the support core starts to fail, no amount of surface cleaning will bring back the original feel.
A practical replacement window for many mattresses is around 7 to 10 years, although that depends on the materials, body weight, and how well the bed has been protected. I would replace sooner if repeated spills reached the inner layers, if the surface never fully dries after cleaning, or if allergies seem worse every time you sleep on it.
The routine I trust most is simple: wash the fabrics on schedule, protect the mattress, and deal with spills the same day. Keep those three things steady, and the bedroom stays noticeably fresher with far less effort than people expect.